Block 1 - Pattern #2 - Seam treatment 1.
Here goes, I am hoping that my photos are nice and clear.
A note before we begin. The seams are the main focus in my style of crazy quilting. So, that means they are created first. The seam treatment is completed in its entirety before moving on to the next seam. By doing it this way, I am able create strong seam treatments that hold the shape of the crazy design. Once my seams are done, I move onto the center of the individual pieces of the block. Gosh, I hope that made sense!
Lets start with the auditioning of threads - you do not get a good read of how the thread will look by laying the whole skein or ball of the thread onto the block.

It's best to lay the single thread on the fabric, this a true reflection of the the thread will appear on the fabric.

Before we get started, I would encourage you to to use slightly larger stitches than you think you need to when doing crazy quilting. It's important to remember that we will be adding beads, stitches etc and if the first stitch is small, there is no space to add extra bits and seam treatments get squashed and heavy.
I often talk about the "bite" of fabric when describing the length of a stitch. The 'bite' of the fabric is where the needle has entered and exited the fabric; as seen in the herringbone stitch and the lazy daisy stitch below.

Most people are very anxious about stitches being lovely and even, some students in my workshops actually measure and mark where the stitches should be. If this makes you happy, please go ahead, however, the more we practice "eyeballing" the distance between stitches the better we will get at it.
Personally, the process of creating is far more important to me than the end result. Perfection is not my goal.
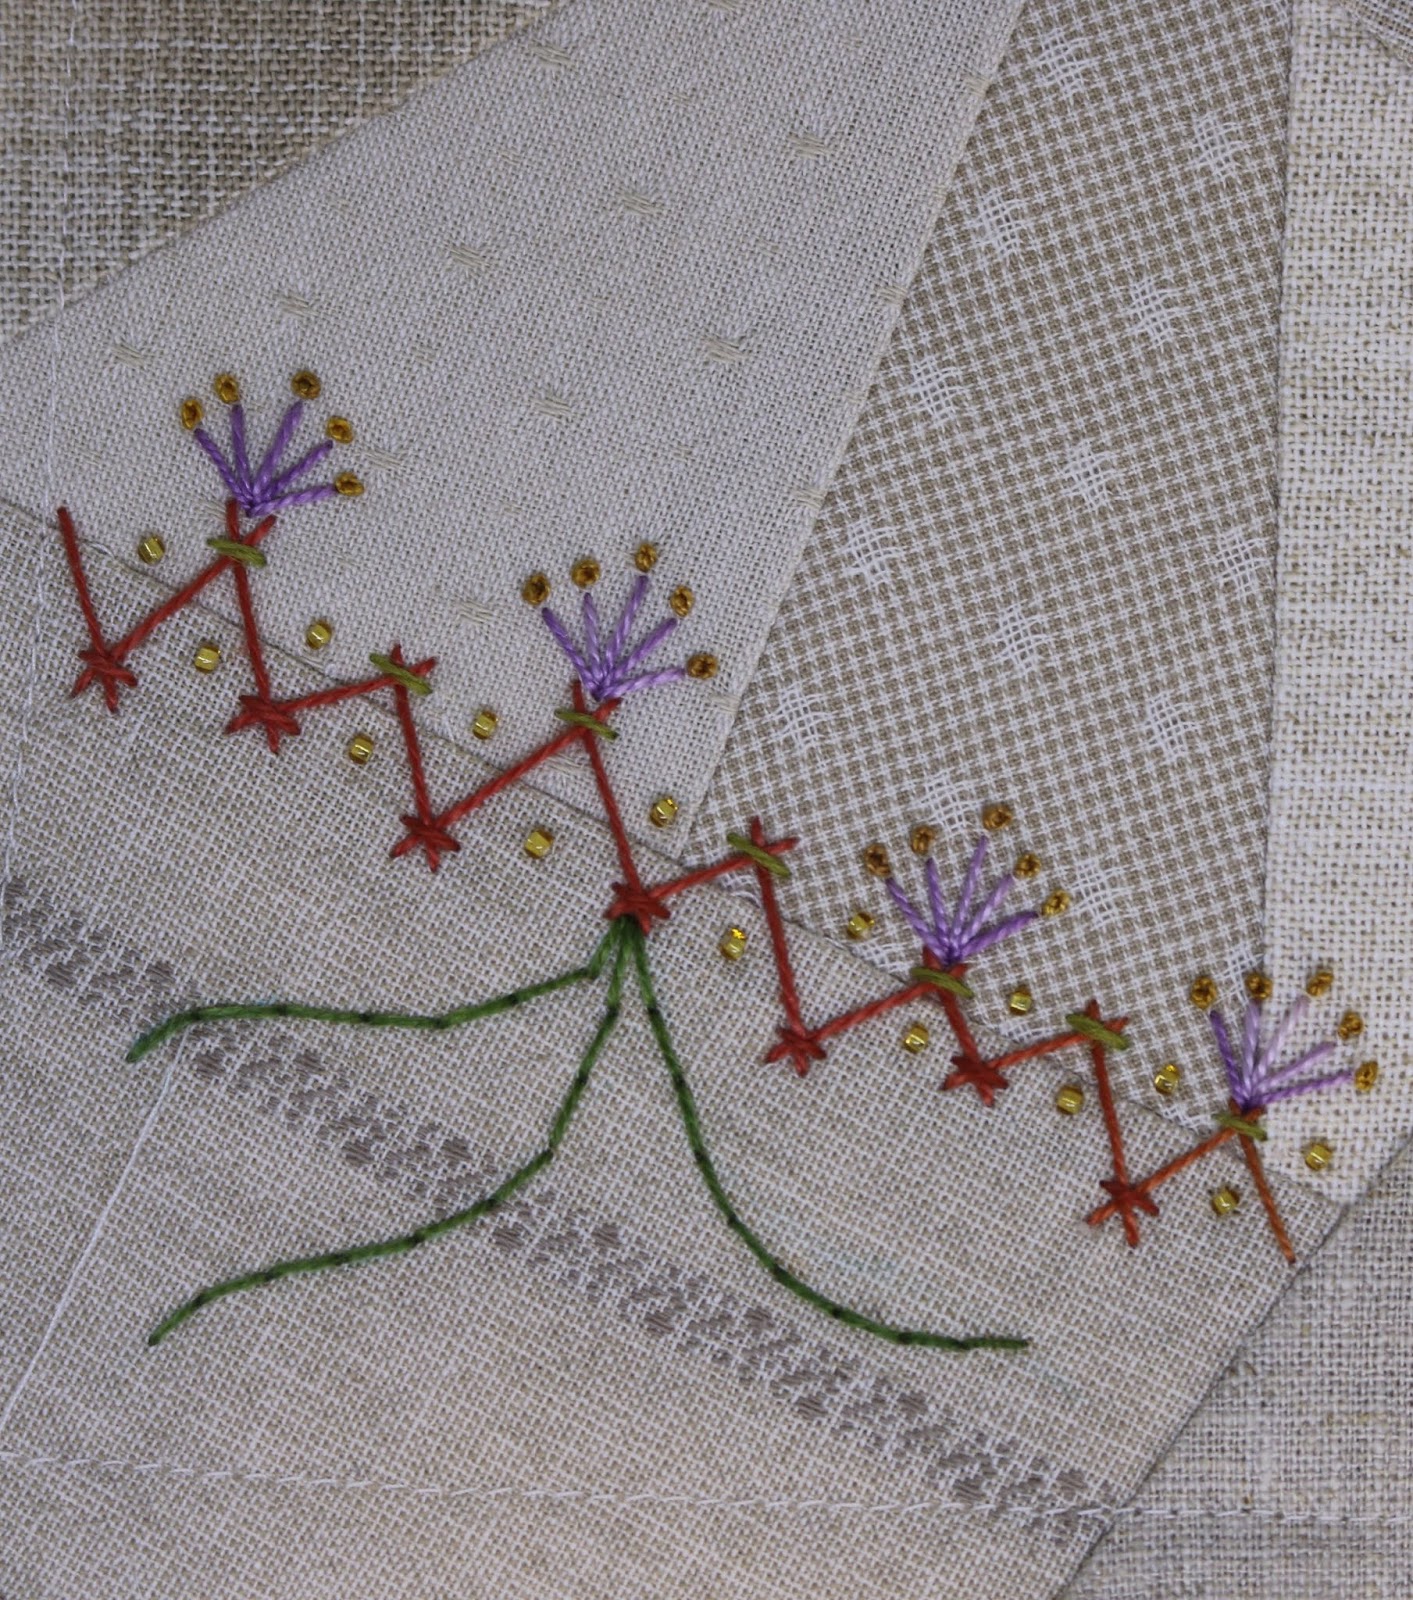
The first seam treatment begins with a herringbone stitch. A simple way of creating a neat herringbone is to keep the "bite" of the fabric parallel to the seam line; the needle is parallel to the seam as well. (As seen in the photo above) .
To create interest, I sometimes deliberately make my herringbone stitch uneven. Yes, yes, I know, most of you will be shuddering right now.
The herringbone on this project from my book FOOLPROOF CRAZY-QUILT PROJECTS is uneven.
However, regardless of whether the stitch is even or not, always try and keep the "bite" parallel to the seam.

Seam that joins piece #5 to pieces #1 and #2
Stitches used:
Herringbone
Straight stitch
Single bead stitch
Colonial/French knot
Lazy daisy
Threads used:
Perle #8
Nymo beading thread
4mm silk ribbon
Small seed beads
1. Generally, the base stitch in a seam treatment (in this case the herringbone) is stitched with a darker thread. Remember, that in crazy quilting we build up a seam treatment - adding more and more stitches, beads etc. If the darker stitches are are the last stitches added to the seam they will float off and not be grounded.
Once again, it's important to point out that I prefer "clean" and strong seam treatments that "hold" the shape of the crazy block instead of all the seam treatments melding into each other.
Herringbone Stitch - FOOLPROOF CRAZY QUILTING page 72 - this stitch is best NOT worked in a stranded cotton.

2. For reasons unbeknown to me, I stabilize the herringbone stitch where is crosses - either with a bead or a straight stitch.

3. Next, lets add some beads - my herringbone was uneven, however, the beads have been placed evenly along the seam.
Single bead stitch - FOOLPROOF CRAZY QUILTING page 85.

4. The simplest stitches are wonderful to use and we sometimes get carried away by wanting to add intricate stitches to our seam treatments - often keeping it simple is way more effective. When adding these straight stitches to the herringbone make sure that they are nice and long! Stubby stab stitches are not very attractive. To create a more open and less cluttered effect do NOT add the straight stitches to each herringbone peak.
Straight stitch - FOOLPROOF CRAZY QUILTING page73.

5. Time to change your needle to a Milliner's because we are going to add colonial or French knots to the end of our stab stitches. A bead may be used instead, but make sure that it is not the same colour as the bead between the herringbone.
Colonial knot - FOOLPROOF CRAZY QUILTING page 71

6. Let's create some movement on the other side of the herringbone. I am aiming to fill the whole corner of this block. Begin with a series of straight stitches, coming out from a central point on the herringbone stitch (Don't splay your bottom!)
Straight stitch - FOOLPROOF CRAZY QUILTING page 73.

7. The little leaves have been stitched with a 4mm silk ribbon and a lazy daisy stitch, but this a perfect time to use some of your stranded cotton (all 6 strands). Make sure the "bite" of fabric is small as we do not want the leaves to be too big. The leaves do not have to be evenly spaced either.
Lazy daisy stitch - FOOLPROOF CRAZY QUILTING page72.

8. Now for some more straight stitches along the stem - no need to have them evenly spaced or even in length.
Straight stitch - FOOLPROOF CRAZY QUILTING page 73.

9. We will finish off some small round pearl beads or colonial knots
Single bead stitch - FOOLPROOF CRAZY QUILTING page 85
Colonial knot - FOOLPROOF CRAZY QUILTING PAGE 71

Voila! We have begun.
Please join me next Monday for the next installment.
Jenny C
A note before we begin. The seams are the main focus in my style of crazy quilting. So, that means they are created first. The seam treatment is completed in its entirety before moving on to the next seam. By doing it this way, I am able create strong seam treatments that hold the shape of the crazy design. Once my seams are done, I move onto the center of the individual pieces of the block. Gosh, I hope that made sense!
Lets start with the auditioning of threads - you do not get a good read of how the thread will look by laying the whole skein or ball of the thread onto the block.

It's best to lay the single thread on the fabric, this a true reflection of the the thread will appear on the fabric.

Before we get started, I would encourage you to to use slightly larger stitches than you think you need to when doing crazy quilting. It's important to remember that we will be adding beads, stitches etc and if the first stitch is small, there is no space to add extra bits and seam treatments get squashed and heavy.
I often talk about the "bite" of fabric when describing the length of a stitch. The 'bite' of the fabric is where the needle has entered and exited the fabric; as seen in the herringbone stitch and the lazy daisy stitch below.

Most people are very anxious about stitches being lovely and even, some students in my workshops actually measure and mark where the stitches should be. If this makes you happy, please go ahead, however, the more we practice "eyeballing" the distance between stitches the better we will get at it.
Personally, the process of creating is far more important to me than the end result. Perfection is not my goal.
The first seam treatment begins with a herringbone stitch. A simple way of creating a neat herringbone is to keep the "bite" of the fabric parallel to the seam line; the needle is parallel to the seam as well. (As seen in the photo above) .
To create interest, I sometimes deliberately make my herringbone stitch uneven. Yes, yes, I know, most of you will be shuddering right now.
The herringbone on this project from my book FOOLPROOF CRAZY-QUILT PROJECTS is uneven.
However, regardless of whether the stitch is even or not, always try and keep the "bite" parallel to the seam.

Seam that joins piece #5 to pieces #1 and #2
Stitches used:
Herringbone
Straight stitch
Single bead stitch
Colonial/French knot
Lazy daisy
Threads used:
Perle #8
Nymo beading thread
4mm silk ribbon
Small seed beads
1. Generally, the base stitch in a seam treatment (in this case the herringbone) is stitched with a darker thread. Remember, that in crazy quilting we build up a seam treatment - adding more and more stitches, beads etc. If the darker stitches are are the last stitches added to the seam they will float off and not be grounded.
Once again, it's important to point out that I prefer "clean" and strong seam treatments that "hold" the shape of the crazy block instead of all the seam treatments melding into each other.
Herringbone Stitch - FOOLPROOF CRAZY QUILTING page 72 - this stitch is best NOT worked in a stranded cotton.

2. For reasons unbeknown to me, I stabilize the herringbone stitch where is crosses - either with a bead or a straight stitch.

3. Next, lets add some beads - my herringbone was uneven, however, the beads have been placed evenly along the seam.
Single bead stitch - FOOLPROOF CRAZY QUILTING page 85.

4. The simplest stitches are wonderful to use and we sometimes get carried away by wanting to add intricate stitches to our seam treatments - often keeping it simple is way more effective. When adding these straight stitches to the herringbone make sure that they are nice and long! Stubby stab stitches are not very attractive. To create a more open and less cluttered effect do NOT add the straight stitches to each herringbone peak.
Straight stitch - FOOLPROOF CRAZY QUILTING page73.

5. Time to change your needle to a Milliner's because we are going to add colonial or French knots to the end of our stab stitches. A bead may be used instead, but make sure that it is not the same colour as the bead between the herringbone.
Colonial knot - FOOLPROOF CRAZY QUILTING page 71

6. Let's create some movement on the other side of the herringbone. I am aiming to fill the whole corner of this block. Begin with a series of straight stitches, coming out from a central point on the herringbone stitch (Don't splay your bottom!)
Straight stitch - FOOLPROOF CRAZY QUILTING page 73.
7. The little leaves have been stitched with a 4mm silk ribbon and a lazy daisy stitch, but this a perfect time to use some of your stranded cotton (all 6 strands). Make sure the "bite" of fabric is small as we do not want the leaves to be too big. The leaves do not have to be evenly spaced either.
Lazy daisy stitch - FOOLPROOF CRAZY QUILTING page72.

8. Now for some more straight stitches along the stem - no need to have them evenly spaced or even in length.
Straight stitch - FOOLPROOF CRAZY QUILTING page 73.

9. We will finish off some small round pearl beads or colonial knots
Single bead stitch - FOOLPROOF CRAZY QUILTING page 85
Colonial knot - FOOLPROOF CRAZY QUILTING PAGE 71

Please join me next Monday for the next installment.
Jenny C


Wonderful Jen thank you 😊👏👏👏
ReplyDeleteLovely!
ReplyDeleteOh my! Absolutely love the leafy spray, so delicate. I have always knotted after each bead. Thank you, Jenny.
ReplyDeleteI'm a little late getting started! Thank you so much for this, Jennifer!
ReplyDeleteI would like to try this. Please send me the pattern or square you are using.. Thank you!
ReplyDeleteHello Jennifer, hope you have a nice birthday today. I would love to make these nine blocks, it is still possible for you to email me the pattern please? Warm regards from Holland,
ReplyDeleteMarga